Some technical steps in a transition to Cloud.

In this blog I like to describe some technical steps we may experience in a transition to Microsoft cloud. In this blog I use a virtual company that want to adopt cloud for the transformation and improvements of ICT and decided to utilize modern workspace cloud capabilities for their employees provided by Microsoft.

What is our use case?

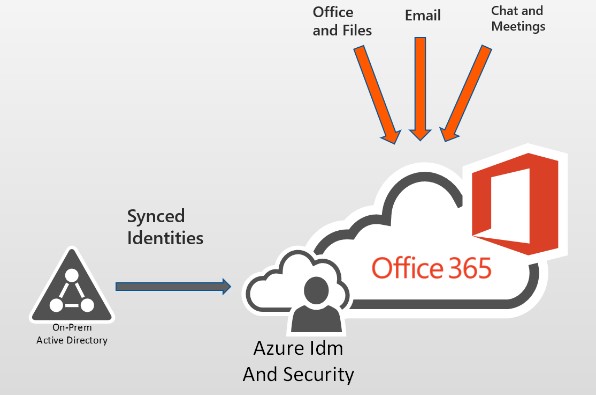
A company with two divisions, where division-2 is a separate organization that is added to the company not very long ago. Both divisions still has their separate ICT and there is no trust relationship between existing AD forests. Users experience with this scenario is not very good, having multiple identities, email accounts, etc.. working for both divisions.

How do we get there?

With that in mind, now take a quick look at the adoption path we leveraged for the transformation. Be aware, there is no single cloud adoption path that works for every organization. But overall, the basics are quite similar and Microsoft guide you through this process.
The transformation in our case is divided in three phases which overlap one another at some point or even run parallel. The phases I used for this transformation will be: Learn, Deploy and Adopt.

The first “Learn” phase mainly focuses on learning and experiencing the Microsoft cloud capabilities (like: Exchange, One-drive, Teams and Office SAAS products). In this phase all environments are still separate from one another and we are using cloud identities for a small group of users.

In the second phase “Deploy” we are moving on to production scale, connecting the environments to make a full transition to Microsoft cloud solutions possible including the migration of data to the Microsoft data-centers.

The last one is the “Adopt” phase. This phase provide enhancements to the cloud solutions and resources deployed for the organization. This phase re-evaluate already deployed services and provide further enhancements, for example with: content/device management, the modernizing of current application services, or even plan for third party (cloud) services.

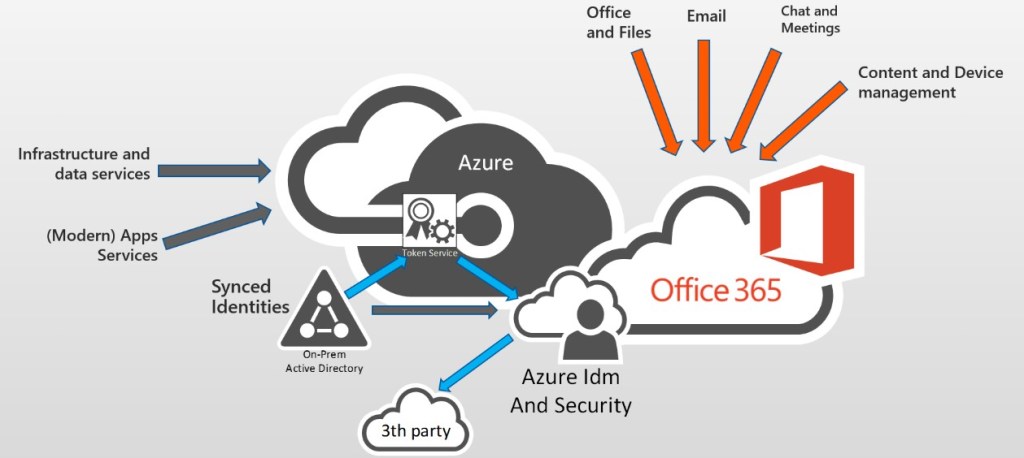
All phases are coordinated from out of a Cloud Center of Expertise (CCoE) working on governance, coaching end-users and supporting the deployment of the Microsoft capabilities within the divisions.

Note: The phases I briefly described have Fast-Track basics and are from a technical perspective. Of course, adopting (Microsoft) Cloud solutions is certainly not a technical only transition, it will most likely change IT procurement and support processes for your organization and the way end-users are productive.

Let the fun start!

So finally, we are at a point to work out a few steps related to the “Learn” phase. Many companies already experience the “Learn” or even the “Deploy” phases, but in our case we are going to look at Role Based Access Control (RBAC) and using a custom domain for the company brand.

At this stage we are signed-up for Microsoft 365 services creating a default Azure tenant utilizing a public account (like outlook.com) with two-factor-authentication. It is sustainable using a name context for the public account that is related to the organization when creating the tenant, rather than using an named account of some employee.

Note: Always handle privilege accounts with care using some sort of privilege account management (PIM). I leave the PIM topic for now, but if you like to know more read the section “additional reading” at the end of this blog.

Now we are off to add a custom domain and some administrators to the Azure tenant. We manage these steps by using powershell, but before we run the commands we need a few things:

  • A device (workstation/laptop) that has a connection to internet.
  • The ID(GUID) of the default tenant we signed-up before.
  • To install AAD PowerShell modules MSOL (Version1) and AzureAD (Version2).
  • To have access to DNS for creating a TXT record that allow us to verify the domain name.

And now hands-on...

During the install of the modules on our device, we are connecting to the PS-repo and must confirm if we trust the NuGet provider to be installed. Also we check if powershell is using TLS12 protocols, otherwise the installation of the modules will fail. Run cmdlet:

[PS]..> [Net.ServicePointManager]::SecurityProtocol

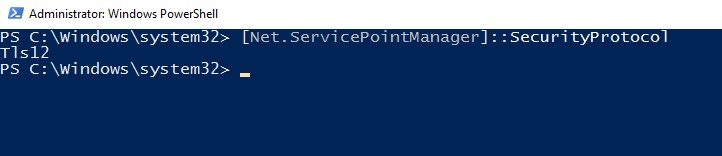
If the check returns a TLS only value, run:
[PS]..> [Net.ServicePointManager]::SecurityProtocol = [Net.SecurityProtocolType]::Tls12

Now we only need to install the modules by running the next command and we are good to go: [PS]..> Install-module MSonline, AzureAD -verbose

At this point we made our preparations for the next steps. With the first step we are going to configure a custom domain for which we need to connect to Azure-AD. Thereafter we run some powershell code to create new cloud identities for the administration roles related to the (virtual)person(s) who is responsible for the job.

[PS]..> Connect-AzureAd -TenantId <GUID>

Note: I can imagine your question why not simply leverage the Microsoft portals? Yes, of course we can leverage the portals too, but I like to show you this using powershell.

The next command is configuring a custom domain and the output shows us the DNS value for a TXT record we need to create in the DNS zone for the custom domain.

[PS]..> $domain = (New-AzureAdDomain -Name Corpxyz.com -IsDefault $true)
[PS]..> Write-host (Get-AzureADDomainVerificationDnsRecord -Name $domain.name | Where-object {$_.recordtype -eq “txt”}).text

Using the text from the command line we need to add a TXT record in the DNS domain zone so, Microsoft can verify if I am the owner of this domain before we proceed adding the company and service admin(s).  The record we did add should look like this: “@ MS=ms26741089 3600 corpxyz.com”

Some simple powershell code to..

With the following simple powershell code, we are assigning the administration roles to new cloud Identities. We are assigning the roles in order of a “company administrator” and second, repeating the step running the code, the administrators for the services.

Note: It is recommended to keep top-level administrators to a minimum, for our case we create just one additional “company administrator” account next to the public account.

param(
        [Parameter(Mandatory = $true)]
        [string]$adminrole,
        [Parameter(Mandatory = $true)]
        [string]$tenantID,
        [Parameter(Mandatory= $true)]
        [security.securestring]$password,
        [Parameter(Mandatory = $true)]
        [string]$upn,
        [Parameter(Mandatory = $true)]
        [string]$alias,
        [Parameter(Mandatory = $true )]
        [string]$displayname
    )

# logon to Azure
Connect-AzureAD -TenantId $tenantID -Verbose

# create cloud identity and assign admin role
$passwordprofile = New-Object -TypeName Microsoft.Open.AzureAD.Model.PasswordProfile
    $passwordprofile.Password = $password

$roleID = (Get-AzureADDirectoryRole | Where-object {$_.displayname -eq $adminrole }).objectID
    IF ($roleID -eq $null) {
        Write-host "Default Role definition not found, enable new role definition"

        $roleTmpl = (Get-AzureADDirectoryRoleTemplate | Where-object {$_.displayName -eq $adminrole}).ObjectId
            Enable-AzureADDirectoryRole -RoleTemplateId $roleTmpl
    
        $roleID = (Get-AzureADDirectoryRole | Where-object {$_.displayname -eq $adminrole}).objectID
       }

$usrID = (New-AzureADUser `
            -UserPrincipalName $upn `
            -AccountEnabled $true `
            -DisplayName $displayname `
            -PasswordProfile $passwordprofile `
            -MailNickName $alias).objectID

Add-AzureADDirectoryRoleMember -ObjectId $roleID -RefObjectId $usrID

# logoff from Azure
Disconnect-AzureAD -Verbose

# clear used variables
$passwordprofile = $null
$roleID = $null
$roletmpl = $null
$usrID = $null

Additionally, we are now specifying the administrators for the services supported by Azure-AD. For example, create an additional administrator for service support.

A you can see at the figure below the code runs are successful and we did create the administrators. The powershell commands shows an overview of the assigned roles looking at the Azure-AD.

[PS]..> Get-AzureAdDirectoryRoleMember -objectID (Get-AzureADDirectoryRole | Where-object {$_.displayName -eq <adminrole> }).objectID

Summary.

With the creation of the administrators I am at the end of this blog session. In this blog we did briefly look at the path used for our transformation, from a technical perspective. Thereafter we configure a custom domain and assigned Role Based Access Control (RBAC) to new cloud identities .

I’m happy to work on this use case and in my next blog I like to show you some more steps belonging to the described phases.

I’ll hope you enjoy reading..

Additional reading:
Office 365 deployment Guide.
Azure Privilege Identity Management.
Beyondtrust Privilege Account & Session Management
.

Unavailable Certificate Templates in a Multi-Domain Forest.

In my previous blog post we looked at the permissions needed on the “CertSrv Request DCOM interface” of the Issuing Enterprise Certificate Authority. As you will know right now is that this DCOM services is used by the “remote create instance request” send by enrollment agents to the CA, and what the minimal permissions for the DCOM service should be to successful process remote certificate requests.

In this blog post I like to take you with me looking at some issues sending remote certificate requests to an issuing Enterprise CA in a multi-domain Forest. In this scenario I worked on an Active Directory Forest including two domain trees where we need to configure additional areas within the certificate service environment. The reason why is, when we deploy an Enterprise Issuing CA in a multi-domain Forest the certificate services setup does not automatically set permissions to handle requests from outside the certification authority’s domain.

By default, enrollment agents from outside the Certification Authority’s domain will not be able to enroll a certificate due to lack of permissions and trust causing the unavailability of certificate templates.

For example, if you run a PowerShell cmdlet to request a new certificate from outside the other domain(s), you end up with the following description.

[ps]..> $dnsnames=”srv1.corpabc.com”
[ps]..> $cert = Get-Certificate -Template ‘Device TLS’ -Url ‘ldap:///CN=lnlabscorp-CA’ -DnsName $dnsnames -CertStoreLocation Cert:\LocalMachine\My

Or if we use the certificate manager snap-in, in the Microsoft management Console to send a certificate request where we leverage the Active Directory Enrollment policy, we experience status issues in the response searching for certificate templates.


Looking under the hood.

The result on the requests to the certificate service are telling us that we have issues receiving available certificate templates and/or that we have no permission to request a new certificate. To manage this issue, we first look at the process of retrieving certificate templates. The following process flow take place querying certificate templates.

Source: docs.microsoft.com

As you will see in the process flow above, is that an enroll agent is sending a LDAP query to the Active Directory searching for available certificate templates. And this is where it goes wrong in my scenario.

Setting up an Enterprise CA will add Active Directory objects in the “Configuration partition” of the Forest. And as you know, this partition is replicated throughout the Forest which ensures that AD integrated services are available for all domains in a Forest.

By default, the setup will take care of the default permissions in the domain where the CA resides but it does not take care of all the permission for the other domain(s) in the Forest.

In my setup the first domain is mandatory for the certificate service.

Configure permissions and trust.

With that said, we need to take care of two things to make sure the certificate service is available to enroll certificates in the other domain(s) of the Forest too.

  1. Configure the CA as a trusted Issuer in the other domain(s).
  2. Setup template permissions to allow access.

The first thing we need to do is to deploy the certificate of the CA (Issuing, Policy and Root depending on the tiers of your PKI) holding the public Key. This certificate we need to install on the “Trusted Root CA” (and/or Intermediate CA) certificate containers of our devices in the other domain(s).

To do this, we create an export of the CA certificate(s) holding the public key, and setup a “Public Key Policy” leverage an “Active Directory group policy object” (GPO). I will not go into many details on this because I believe you already know how to manage this.

GPO public key policy

Note: We need this certificate to close the certificate chain to make sure we can trust the CA so that the issued certificates and used templates are valid.

The second thing we need to do is to configure the appropriate permissions on the certificate template(s) we provide for the enroll agents in the other domains of the Forest. I created a template called “Device TLS” before, setup the attributes we need and now add these permissions to this template:

  • <seconddomain>\agents – Read, Enroll.
  • <seconddomain>\computers – Enroll.

Note: Notice I delegate the permissions to global groups from the second domain in the forest by adding these to the “Device TLS” template in the first domain.

Check availability of our certificate service.

At this point I run my PowerShell cmdlets again to request a new certificate with the template I did create before and as you see the certificate service is now fully available to enrollment agents outside the CA’s domain, and my request is successful.

[ps]..> $dnsnames=”srv1.corpabc.com”
[ps]..> $cert = Get-Certificate -Template ‘Device TLS’ -Url ‘ldap:///CN=lnlabscorp-CA’ -DnsName $dnsnames -Subjectname “CN=$dnsnames” -CertStoreLocation Cert:\LocalMachine\My
[ps]..> $cert | FL

Great, now the certificate manager snap-in is also showing a successful result too, see the availability of the certificate template I create. Now we can carry on sending remote certificate requests from all domains to certificate service in our forest.

Summary.

With this simple setup I try explaining the concept on an AD integrated certificate service in a multi-domain forest. We did experience some enrollment issues in the second domain due to lack of permissions and trust causing the unavailability of certificate templates. We managed this by taking care of the following two things:

  1. Configure the CA as a trusted Issuer in the other domain(s).
  2. Setup template permissions to allow access.

Note: Always use RBAC to design your environment and restrict enrollment agents to only those identities who are authorized for the job.

Thank you for reading!!

Additional readings:

Enroll on Behalf of Request and Renewal

“RPC server unavailable” error requesting Certificates.

Installing a Active Directory Domain- and Certificate Services within my Infrastructure as a Services (IAAS) environment, I ran into Issue’s deploying certificates. I am not able to remotely request certificates with, for instance, the certificate manager snap-in of the Microsoft management Console (MMC) at a Windows 10 clients and Windows 2016 IIS member servers. Next you will see a simple overview of my setup.

I run the certificate manager snap-in, in the Microsoft management Console where I select the computer account certificate store and then my personal certificate container. I choose “Request New Certificate” where the wizard opens an dialog to request a certificate, we leverage the Active Directory Enrollment policy for the request. After defining the certificate attributes, I am of to enroll the required certificate and end up with the following error message:

Certificate enrollment for Local system failed in authentication to all URLs for enrollment server associated with policy id: …..(The RPC server is unavailable. 0x800706ba (WIN32: 1722 RPC_S_SERVER_UNAVAILABLE)). Failed to enroll for template: …

Note: This Issue generates two events with ID numbers 82 and 13 in the application section of the event viewer on my member server.

Causing the unavailability of a RPC server spans many scenario’s, to begin with looking at network, firewall or service issues. Before I dive into the network layer or spitting down the local firewalls in my IAAS environment I first shoot of some basic test commands to see what is happening here.

Check Remote procedure calls to the CA

Assume there is an issue with the RPC channel to the CA server I leverage the following tests to find out if there are issues related to network or service availability. For action this I use the PowerShell command line to run some cmdlets an start off with the Nltest command to find out if there are problems with netlogon calls from the requesting member server to domain controller in the active directory domain.

[PS]..> Nltest /Server:<DC_FQDN> /query

This result tells me there is no issue with the netlogon service requests sending from the member sever.

Next I check if remote procedure calls (RPC) Service on the Enterprise Certificate Auhority is available to receive calls from my requesting member server. With this we also implicit check if some firewall setting or network related issues prevent us from connecting to the Certificate Authority.

[PS]..> Test-NetConnection(alias tnc) -ComputerName <CAname> -Port 135

Also this test is successful and give us the response we want. Using the CA server FQDN tells me that DNS is working fine as well.

[PS]..> Get-WmiObject(alias gwmi) Win32_computersystem -ComputerName <CAname>

Checking how the CA responding

We check network and service related scenario’s and they give no errors. With this we have to look further to find out if the CA is responding the correct way. These actions checks if there are issues with the following interfaces:

  • Active Directory Certificate Services Request interface: Certutil -ping
  • Active Directory Certificate Services Admin interface: Certutil -pingadmin

I the following commands I run on the PowerShell Command Line from off the member to the Enterprise Certificate Auhority server.

A screenshot of a cell phone

Description automatically generated
[PS]..> Certutil -ping -config <fqdn>\<CaName>
PS]..> Certutil -pingadmin -config <fqdn>\<CaName>

Both commands are telling us that the we have no issues related to the Enterprise Certificate Authority interfaces handling the request and we have to dig deeper.

Investigate the request flow with Wireshark

The test scenario’s in section above tells us there are no issues with network and services, so we must dig deeper into the request. For this I am going to use Wireshark and dive in to request we are sending from the Member server.

In this case I installed Wireshark on the member server but there other possible scenario’s to fiddle the network traffic. The figure below shows us the outcome of the Wireshark trace:

Wireshark Trace

Analyzing the trace gives us an E_Accessdenied result back from the “CertSrv Request DCOM interface” of the Enterprise Certificate Authority. This DCOM services (see figure below) is used by the “remote create instance request” part of the trace which send from the member server to the CA.

Dcom CertSvc Interface

The permissions on the DCOM interface

For “CertSrv Request DCOM interface” to work without errors, there need to be some security settings in place to guarantee the DCOM interface respond as it should be.

1- One is the builtin domain local security group “Certificate Service DCOM Access. This security group is automatically created during setup of the AD-CS role and should minimally have the “Authenticated Users” as a member of this group. Which in our case, this configuration suits this requirement.

Note: If the certification authority is installed on a member server, “Certificate Service DCOM Access” is created as a computer local group. The Everyone security group is added to “Certificate Service DCOM Access”.

2- Second are the security properties of the DCOM service. Opening the security properties of the Certsvc Request services in the DCOM Config (dcomcnfg) we see three area’s of permissions we can configure.

  • The Certificate Service DCOM Access security group is granted local and remote access permissions.
  • The Certificate Service DCOM Access security group is granted local and remote activation permissions.
  • The Certificate Service DCOM Access security group is not granted local or remote launch permissions.

Note: We should not set the Everyone security group on the CertSrv Request DCOM interface, always restrict access to the interface for security reasons. In my case only the Certificate Service DCOM Access security group was added to the DCOM interface.

After investigating the settings on the two area’s above we find out there is nothing wrong, all security setting above are in place, as expected. Fact is, we still are not able to request a certificate and ending up with a E_Accessdenied.

The first two parts of permissions the don’t have anomalies so we have to look further Request DCOM interface.

Third part of the interface is the configuration permissions. Default there are the following permissions are set:

  1. Application Packages
  2. Creater Owner
  3. System
  4. MyDomain\Administrator
  5. MyDomain\Users

Seems quite normal here too so I decide to check on the default security groups and there group members. I used the following reference for this: https://docs.microsoft.com/en-us/windows/security/identity-protection/access-control/active-directory-security-groups

Checking the MyDomain\Users and found out there is no match with the Microsoft reference guide. We are missing the special groups INTERACTIVE and “Authenticated Users”. I decide to add these security principles one by one to the MyDomain\Users group. I started with “Authenticated Users” and off we go, this is solving the access denied issue causing the event “The RPC server is unavailable” on the client and member requesting a Certificate.

Summary

I recover the default memberships of the Mydomain\Users security group and this resolve the issue causing the event “The RPC server is unavailable” when requesting an certificate. Reason why we are missing the default members in the Mydomain\Users security group I still did not find out yet, but for now we are good to go and carry on setting up the environment using the Enterprise Certificate Authority.